Azure Data Factory - Production deployment
This is part of a series of blog posts where I’ll build out Continuous Integration and Delivery (CI/CD) pipelines using Azure DevOps, to test, document, and deploy Azure Data Factory.
Start with my first post on CICD for Azure Data Factory for an overview on the how and why.
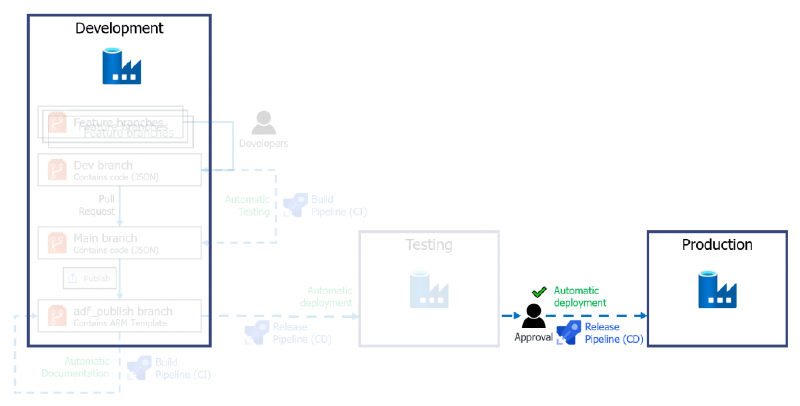
Having built our initial deployment pipeline to get us from our Dev environment into the Test environment, we need to think about a way to get our changes into Production and the checks we want to put in place before that happens. There are a few more steps to consider when deploying to Production. We dont want to just deploy the same changes, immediately after our Test deployment. Then we really just have two Test environments.
This is where release approvals and gates come into play. Beyond these controls, our production stage will largely be the same as our Test stage.
If you’d like to skip the theory, the implementation steps start here.
Approvals vs gates#
Approvals and Gates are the two main control mechanisms that we can use to control what happens and when, in our deployment pipelines. There is a third option however: manual intervention. A manual intervention task is intended for scenarios where there are external tasks or actions that a user needs to carry out, or potentially involves other processes that can’t be automated.
NOTE: Manual intervention and validation tasks can only be used with an agentless job. It is also the only control task we can actually define inside our YAML file.
YAML Pipelines vs Classic#
Its important to mention at this point that not all control tasks are available (yet) when using YAML pipelines. I’ll highlight differences between the two types of pipelines throughout this post. All tasks available to your pipelines can be found in the Microsoft docs Task index.
Approvals#
Approvals give us a stop or pause point in our pipeline where a specific user, group, or multiple users must approve or reject a deployment for the pipeline to continue.
How our approvers are notified of their required action is defined at the project level in Azure DevOps. It’s important to know that making any changes here will affect all pipelines in that project though.
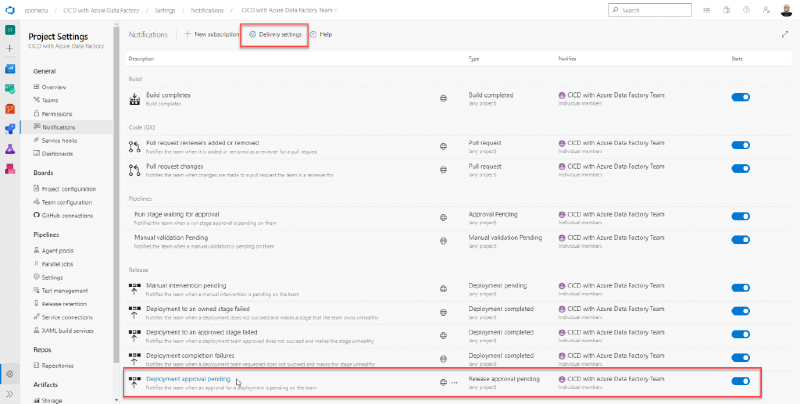
Project-level notification settings
With YAML pipelines, you can only implement a pre-deployment approval step and this is created using the GUI, outside of the YAML file. There’s a split of opinion on whether this is the best implementation of approvals. It means the entire pipeline isn’t in a single YAML file, under source control, but it also means an approval step can’t just be deleted from the file easily.
When setting up approvals it’s also important to make note of the timeout limitations. Timeouts give you a set amount of time for an approver to approve or reject the pipeline’s subsequent tasks. If the timeout is reached, the deployment is rejected and automatically stops with a failure state.
The timeout limit came down from a maximum of 365 days with Classic pipelines to just 30 Days with YAML pipelines so bear this in mind when setting up approvals. I don’t think 30 days is unreasonably low but it may conflict with your processes.
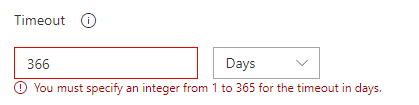
Classic pipeline approval timeout
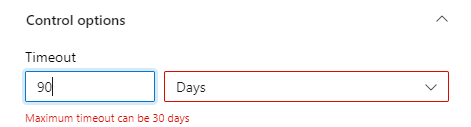
YAML pipeline approval timeout
Gates#
So Approval and Manual intervention tasks require some form of human input. This is where Gates differ. Gates are checks or actions that can be assessed and completed automatically.
The gate options available to you currently differ whether you are using Classic pipelines or YAML pipelines. As we are focussing on our YAML pipeline I’ll concentrate on those options.
One very useful gate that’s currently absent from the YAML pipeline options is the ability to query a count of Azure DevOps work items for a given query. This means you could check that all issues and bugs were resolved before deploying.
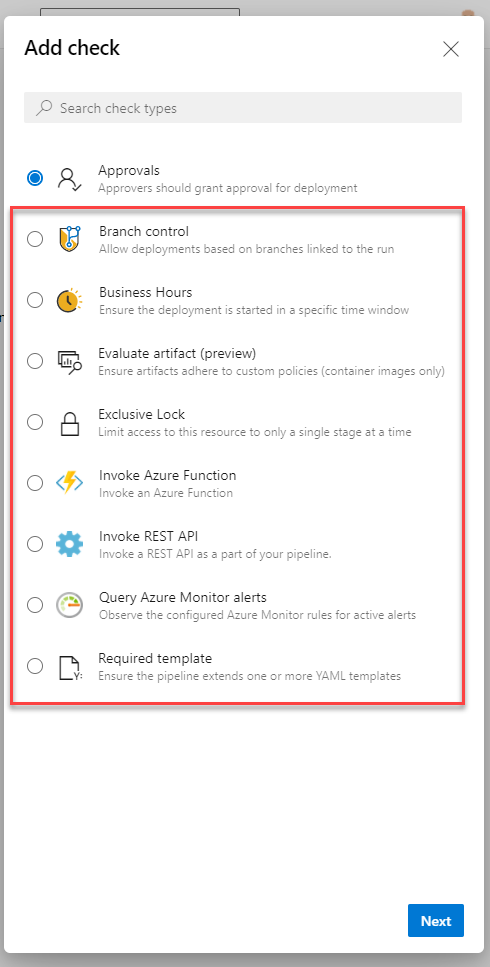
YAML pipeline gate(check) options
Some examples of gates shown above include the ability to run an Azure function and ensure successful completion before proceeding. Another, that we’ll implement here, is a Business Hours check. This is really handy for ensuring that a production deployment only takes place in a specific weekly window. At the very least, it can be used to ensure that there will be support there, should something go wrong.
Implement Approvals and Gates with YAML pipelines#
There’s great documentation on using approvals, gates and manual intervention tasks in Microsoft’s docs but it’s more relevant to classic pipelines and not YAML pipelines which, as explored above, is a little more complex.
To explore the options with YAML pipelines, lets implement a few controls:
- An Approval requirement to protect our production environment.
- A Gate to restrict our deployments to specific deployment times.
In order for us to set up approvals and gates we need to first create and use an Environment in our deployment pipeline. There is much more functionality to environments that we wont need or use here but they are required to allow us to create approvals and checks.
Create environments#
I’ll create an environment for each one we have (Dev, Test, Production), although we’ll have no use for Dev. We are also creating these with no resources as they are essentially references for our control mechanisms and don’t relate to Data Factory in any way.
From the Environments menu option, click Create Environment or New Environment if this isn’t your first one.
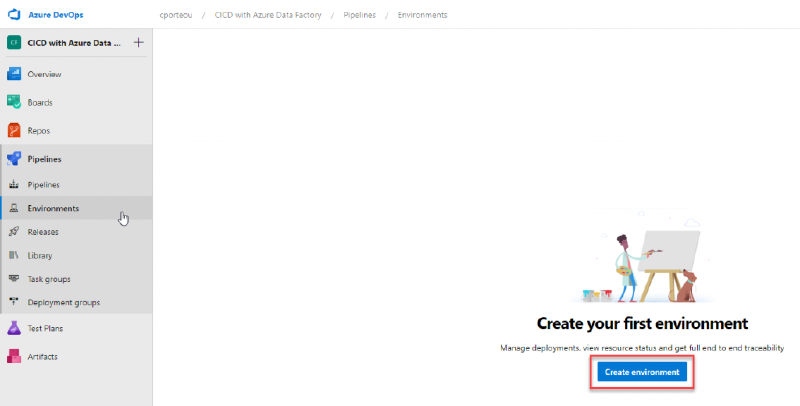
Environments tab
Type in the name of your environment, a little description and select None under Resources as we wont use Kubernetes or VMs here.
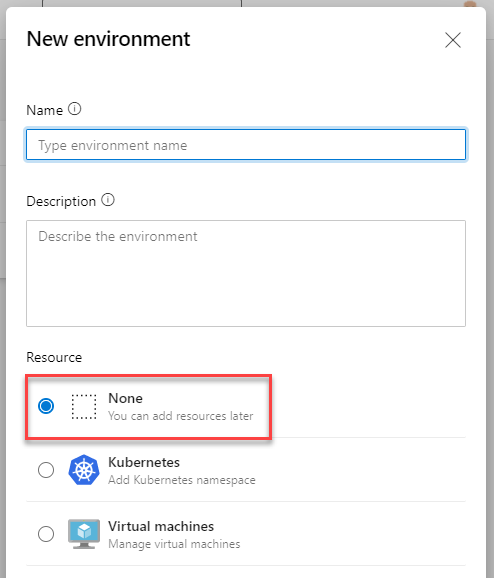
New environment dialog box
Repeat the process for all your environments. Once created you’ll notice the syntax you’ll need for the YAML pipelines in the middle of the screen.
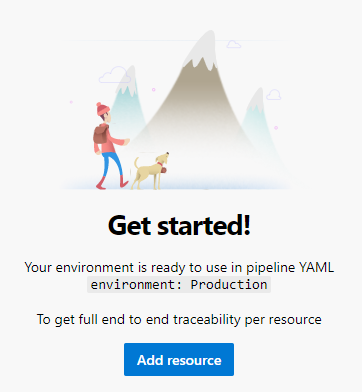
Environment summery info
Update the YAML file#
The first thing we’ll do is add these environment references to our YAML file. That means we need to make some updates to the previous iteration of our file
\[LINK\].
We need to update the job inside our YAML file to a deployment job. This is a special type of job that gives us deployment history and the ability to add an overarching “strategy” (but that’s a topic for a future post).
Here’s what the job definition currently looks like:
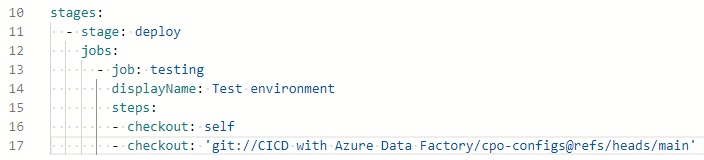
Existing stage and job YAML excerpt
We need to change “job” to “deployment” which will allow us to add the environment reference but that also means we have to add a few more lines before executing steps.
- strategy - there are a few options here but they’re more relevant to app deployment so we’ll use runOnce here.
- deploy - In the runOnce deployment strategy we have a few lifecycle stage options but we’ll focus on deploy here. More info can be found in the Deployment jobs documentation.
After changing the name of the stage to make it more relevant, this is what the same section of code looks like.
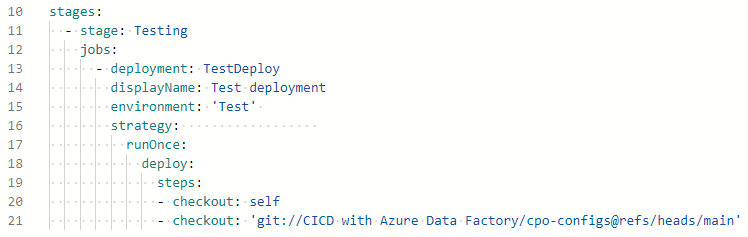
Updated stage and job YAML excerpt
For our Production stage we can pretty much copy/paste the same code from the Test deployment with a few changes highlighted below:
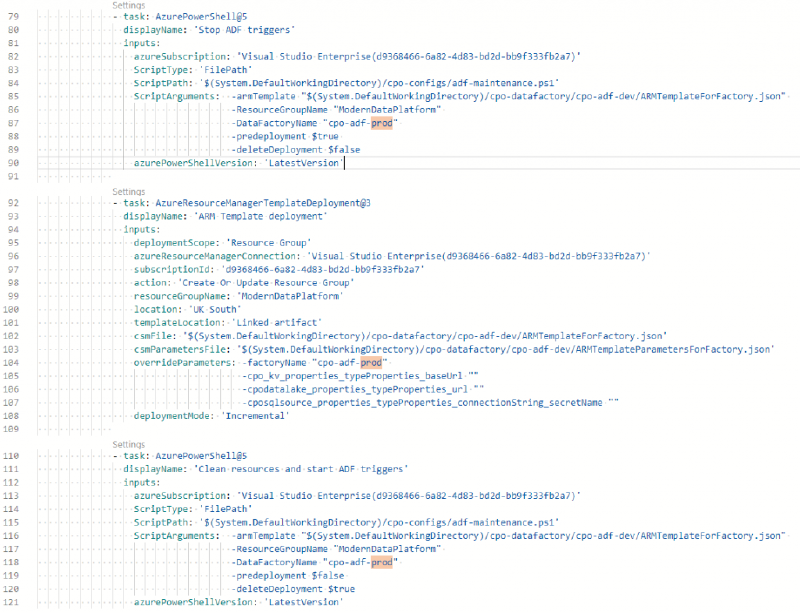
Production code excerpt
If we defined the key vault, data lake or SQL server resource parameters, we’d also provide new values for them here too.

ARM template parameters
Save the azure-pipelines.yml file and remember to use ***NO_CI*** in the commit message so it doesn’t trigger the pipeline.
You can find the completed YAML file in this Github Gist
Set up an approval#

Now that we’ve got our YAML file updated with the production deployment step and to use environments, we can implement the approval step.
From the Environments tab in DevOps click on the Production environment that we created earlier.
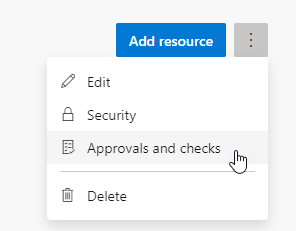
From the elipses in the top right corner, click on Approvals and checks.
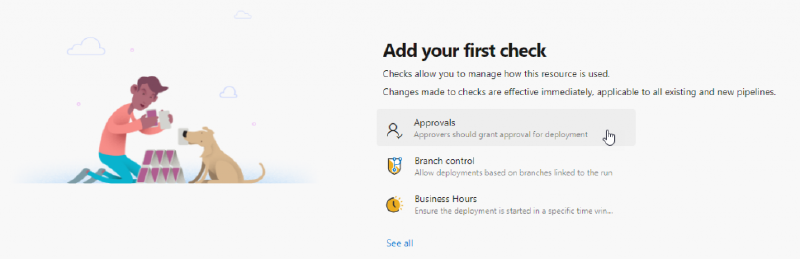
Approvals and checks screen
Click on Approvals and a side bar will pop out for you to fill in who the approver(s) will be, an optional message, whether they can approve their own runs and a timeout for the approval, bearing in mind the maximum we noted above.
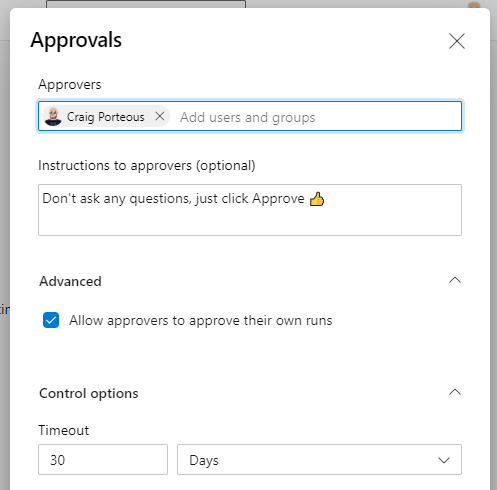
Approval settings screen
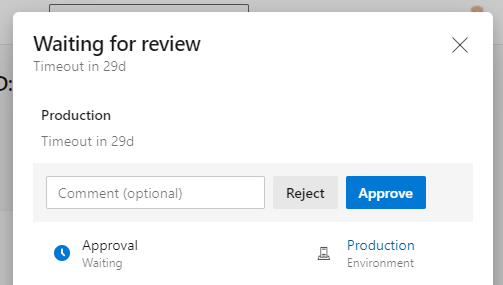
And thats us. When we next trigger a deployment we will see the approval step and our approver will receive the email request to approve our production deployment.
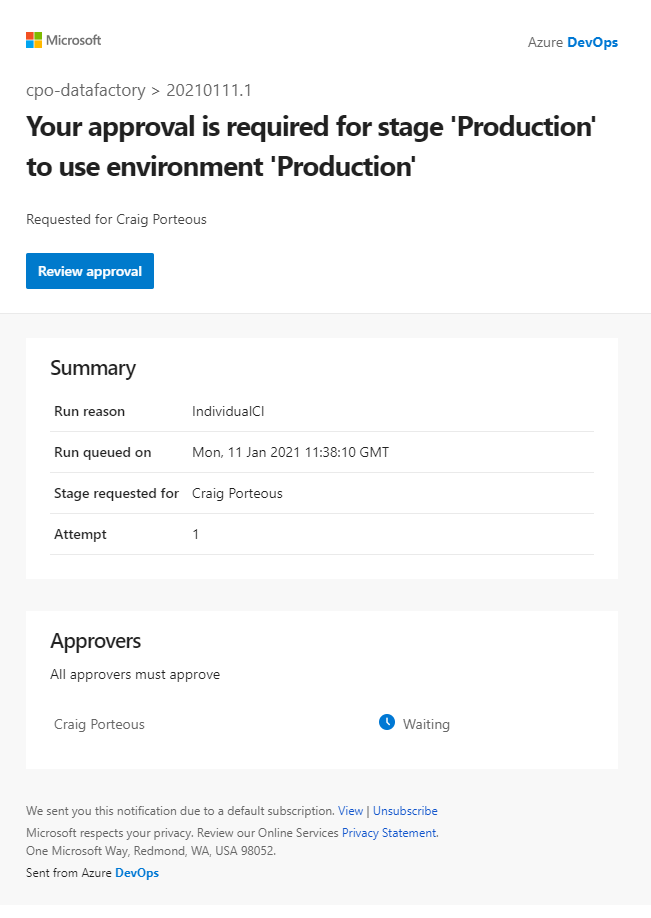
Pipeline run approval message
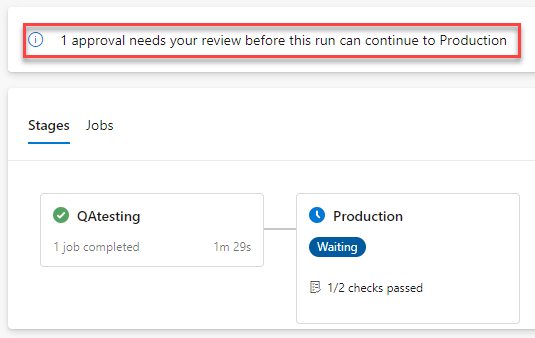
Pipeline run stages and approval message
Pipeline run review points showing approval restriction
Set up a deployment gate#
As I mentioned earlier, gates are handled much like Approvals for YAML pipelines and we can set them up from the same place, in the Approvals and checks menu option of our Production environment.
We’ll now just see a + icon in the top right as we have an Approval in place already here. Click the + and select the Business Hours check.
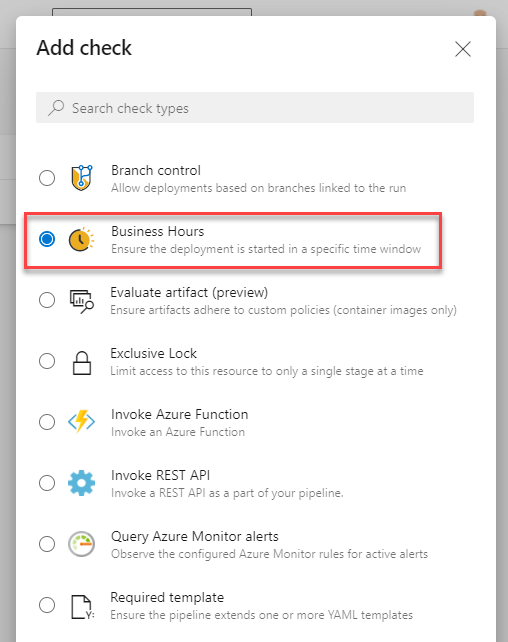
YAML pipeline gates/checks
We can leave a lot of defaults here but lets expand the business hours. I don’t know many people who work 4am to 11am.
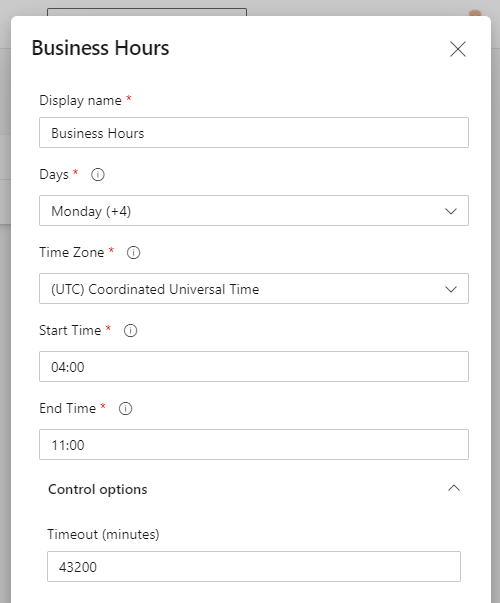
Business Hours check settings
It’s worth noting that the default timeout of 43,200 minutes is 30 days like our approval, but there is not the same limit here. You can increase this beyond 30 days. I can’t imagine why you would need to and even if you only had one hour of one day selected as “business hours” for this gate, the highest duration you could reach would be 7 days.
With that gate/check in place we will now see the following when we try to deploy outside of these business hours.

Pipeline run check message
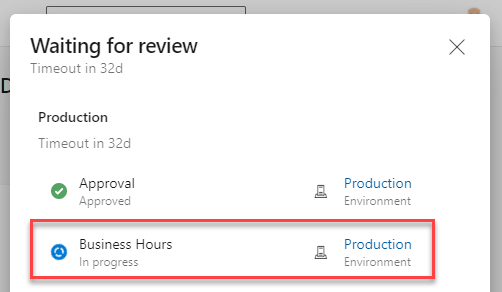
Pipeline run review points showing business hours restriction
Conclusion#
It’s frustrating that one of the most significant selling points of building YAML pipelines, having everything in a single source controlled file, is lost when setting up approvals and gates. That being said, the current methods may change in the future and there is still several gate types (including work item checking) that are possible in classic pipelines but not yet available in YAML pipelines.