Azure Data Factory - Delivery components
This is part of a series of blog posts where I’ll build out Continuous Integration and Delivery (CI/CD) pipelines using Azure DevOps, to test, document, and deploy Azure Data Factory.
Start with my first post on CICD with Azure Data Factory for an overview on the how and why.
I’m building the deployment stage (CD) in this post so we can get the Data Factory deployed from Development to a Testing environment. I’ll then build upon that pipeline in subsequent posts, to test and document the Data Factory before we deploy it.
Why YAML?#
In Azure DevOps, YAML based build pipelines have been around for a while and with Continuous Delivery (CD) pipelines arriving in April this year (2020) all pieces of the puzzle have come together. With the UI-based pipeline and release process being referred to as “classic” mode, it’s obvious that YAML is the way forward for your CI/CD pipelines in Azure DevOps. That’s a good thing though, as your build and release pipelines are now part of your source controlled code. It does however, bring a significantly steeper learning curve.
Focussing on continuous delivery (CD) of our Data Factory in this post, I’ll walk through the steps to set up a deployment pipeline using YAML. This will roughly follow the steps outlined in Microsoft’s own docs on Continuous integration and delivery in Azure Data Factory which detail the “classic” method, through the GUI. It is well worth reading through this document before or while following this tutorial.
There are other methods of deploying Data Factory resources that address the shotgun approach of Microsoft’s ARM template deployment. One such method utilises an Azure DevOps extension developed by fellow MVP, Kamil Nowinski. I won’t cover them in this post to keep the steps straight forward, but you can find out more about different methods from the links below:
- https://sqlplayer.net/2019/06/deployment-of-azure-data-factory-with-azure-devops/
- https://www.mssqltips.com/sqlservertip/6510/using-azure-devops-ci-cd-to-deploy-azure-data-factory-environments/
Once you get a grasp of what Azure DevOps is doing with the YAML config file, you could easily build out a pipeline to use these other, more targetted deployment methods.
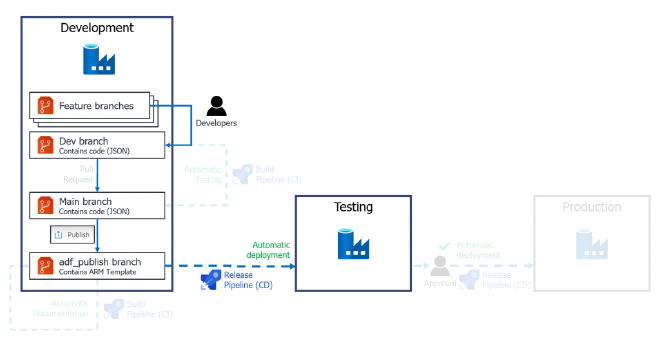
The CD pipeline#
Here’s an overview of what we will build in this post:
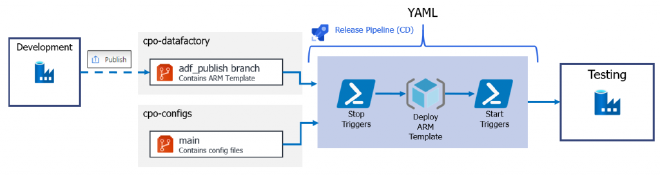
Example CD pipeline for Azure Data Factory
- When we hit Publish inside our Development Data Factory, the commit of the ARM template to our adf_publish branch will trigger our YAML pipeline. This will start an agent machine inside DevOps and pull down a copy of the Data Factory code in the adf_publish branch and a copy of the maintenance file from the config repo.
- The maintenance script will then be executed which will stop any potential triggers on the Testing Data Factory environment.
- The ARM template is then deployed to the Testing Data Factory
- Finally, the same maintenance script will run with different parameters to re-start triggers and clean up any resources not deployed from the Development ARM template.
This whole process can be easily replicated for a Production stage with an additional “Approval” step added in to delay deployment for testing and verification.
Prerequisites#
In order to implement either a YAML or classic continuous delivery pipeline we will first need to make sure we have the tools and resources I outlined in the first post:
- Azure Data Factory resource in git integrated mode (Development environment).
- Data Factory Testing environment resource.
- An Azure DevOps project.
One additional step needed is to create a Data Factory pipeline or two so we have something to deploy.
Prep#
We’ll start with creating a new “configs” git repository and committing Microsoft’s “stop trigger” PowerShell code as our maintenance script. This is an optional step and the script file can sit inside the same repo as your Data Factory ARM templates but I’ve separated it out to another repo for better visibility and so I can add other config scripts later. It also allows me to demonstrate how to pull from multiple repos in the YAML file.
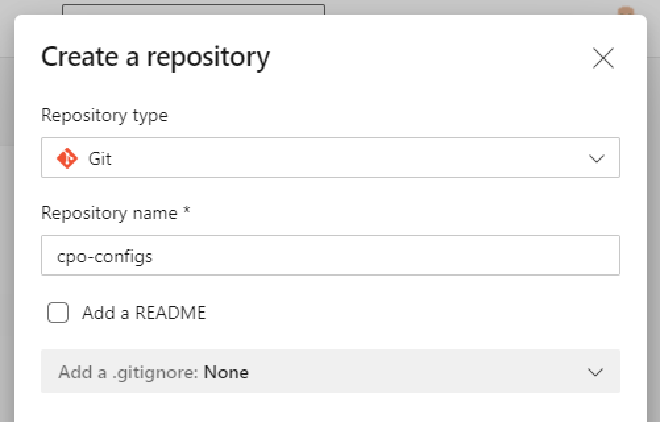
Azure DevOps Create Repository menu
I use Visual Studio Code in the video below but there’s plenty ways to commit this file into your new repository. (There’s also a Clone in VS Code button to make it a little simpler)
If you’re not overly familiar with git, you can check the Add a README box to initialize the repo and then select New > File from the three dots in the top right. Set the name as adf-maintenance.ps1 (prefixed with a subfolder if you wish). Paste the script from Microsoft’s docs page in and hit Commit.
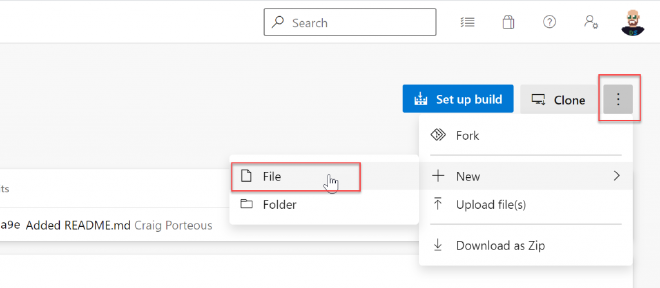
Create new file in git repo
Create the pipeline#
With our support script in place and data factory ready to be published we can now create our YAML pipeline. There is a catch here though, which is specific to how Azure Data Factory uses git branches:
Azure Data Factory does not follow a standard git flow. The code stored in the main/master branch will never be promoted to where the ARM templates are output, in the adf_publish branch and vice versa. As we want to work with the adf_publish branch, we need our YAML config file in that branch.
Azure DevOps automatically picks up the default branch when selecting where to store the YAML config file. This is set to main/master by default.
To allow us to save our YAML file to the right branch we need to pre-create the adf_publish branch by publishing in Azure Data Factory and temporarily set adf_publish as the default branch in Azure DevOps.
Publish something in Data Factory before continuing to allow us to see and use that branch.
Navigate to Branches in Azure DevOps and make sure the right repo is selected at the top of the page. Click the elipses to the right of the adf_publish branch and select Set as default branch.
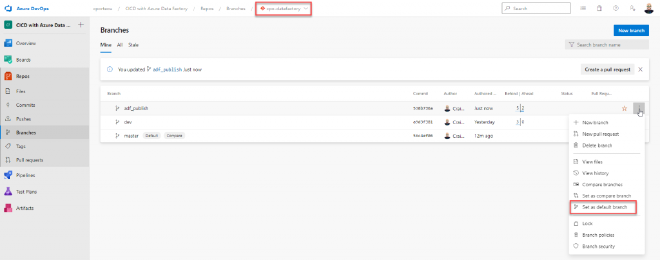
Setting default branch in git repo
Now we can create our pipeline as normal. You can revert this default once we’ve created and saved the YAML file.
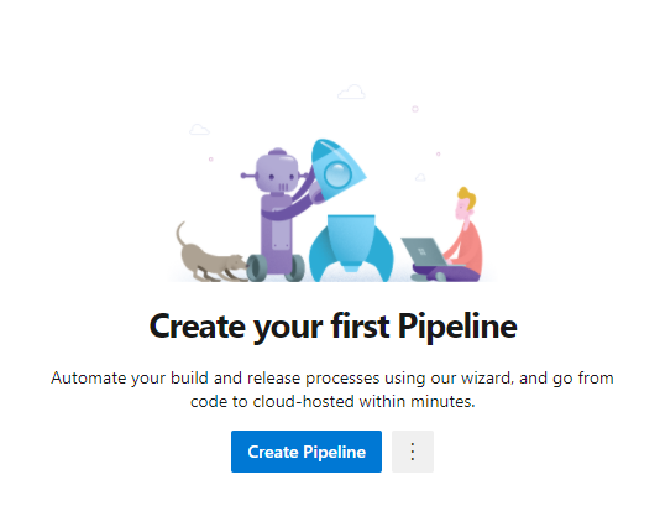
Navigate to Pipelines in Azure DevOps and in the middle of the page, click Create Pipeline.
New Pipeline page
Select Azure Repos Git on the Connect tab.
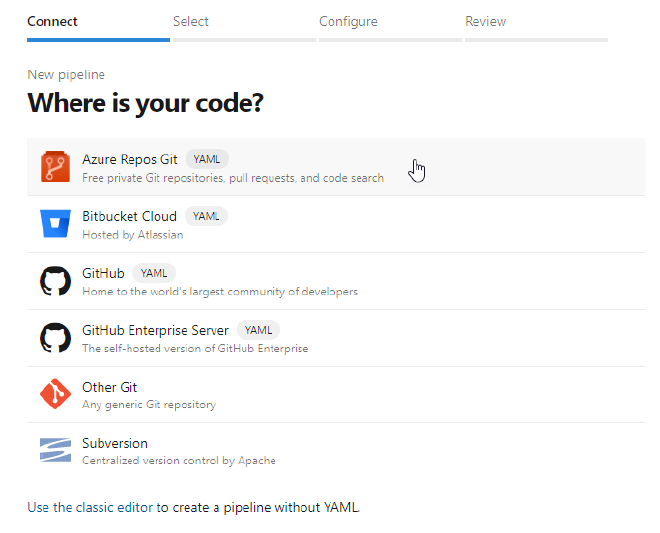
Pipeline sourcing connection
On the Select tab, choose the repo containing your data factory resources.
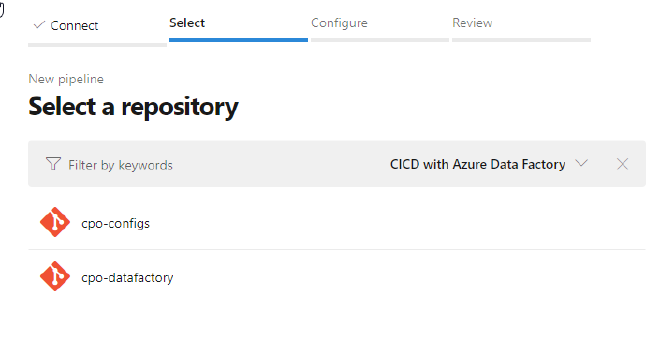
Repository selection
On the Configure tab, select Starter pipeline to give us a basic YAML file.

You will now see the Review tab where you can see the YAML file and it’s basic content, shown below. The first thing we want to do before we dive in is to save the file.
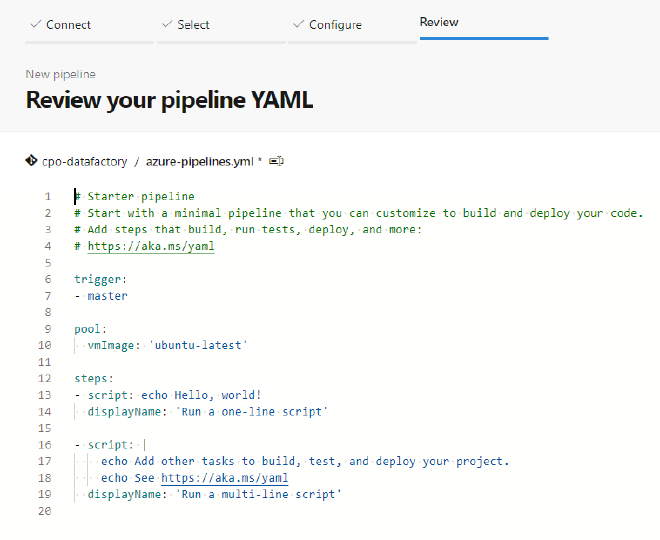
Azure pipeline YAML template
From the Save and Run button on the right-hand side of the page, hit the drop down and choose Save.
Double check that the radio button on the save screen says Commit directly to the adf_publish branch.
Once you’ve done this you can go back to the Branches menu in DevOps and change the default branch back to main/master
Writing the YAML#
There’s a lot of good guidance in Microsoft’s docs on the YAML Schema and how to use it. The examples are a bit lacking in my opinion but it’s enough to help you set up the basics and worth reading over throughout this tutorial.
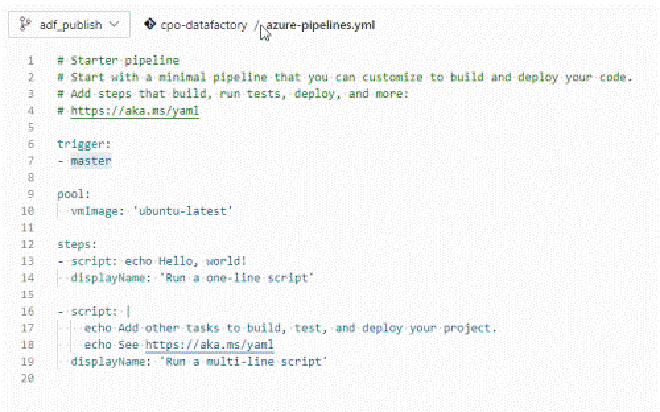
Go back to the Pipelines menu, click on the pipeline we’ve created (it will likely be called the same as your repo name) and click Edit in the top-right of the screen.
Let’s start by updating the trigger to our adf_publish branch and the vmImage to a Windows agent (vs2017-win2016) for our code to run. A list of agent types and names can be found on the Microsoft-hosted agents doc.
Trigger and agent updates to YAML file
Now we can start to build out the structure of our YAML file and set up the steps we need. We’ll break it down into three stages, test, document, and deploy. Leaving the Test and Document stages alone for now, we’ll add a job to the deploy stage called testing and give it a nice displayName: Test environment. Start by deleting the example code that’s there and be sure to indent for each sub-section. Intellisense on the YAML file should help you but can sometimes hinder on new lines
Set up stages and jobs in YAML file
Multiple repositories#
Before we set up the tasks we need to checkout the other git repo. This also means we need to checkout the “self” repo too in order to get the code from the repo/branch that triggered the pipeline. More info here: Check out multiple repositories in your pipeline. Add these lines directly after the job’s displayName: Test environment line.
yaml
      steps:
      - checkout: self
      - checkout: 'git://CICD with Azure Data Factory/data-engineering-configs'
Warning
If your default branch is not named master (ie using the new “main” naming) you will likely encounter an error checking this repo out as the reference to master appears hard-coded into DevOps.
To get round this we need to checkout a specific ref. Update the above git URL to this:
git://CICD with Azure Data Factory/data-engineering-configs**@ref/heads/main**
Ref: Checking out a specific ref
We’ll set up three tasks inside our Test environment job for each action we want to perform:
- Stop ADF Triggers
- A PowerShell task
- Deploy the ARM Templates
- An ARM template deployment.
- Clean up and Start ADF Triggers.
- A PowerShell task
At this point we need to essentially type out the task name we want, selecting from an intellisense pop-up, or use the assistant menu on the right. Find the task we want and Add it. We can also use the assistant to fill out all of the components we need before adding it to our code. This is probably the best way to do it as there is no way you’d know exactly what to type in YAML otherwise. Copy paste is your friend though! Here’s what your YAML should look like and I’ll walk through each task below.
You may be saving regularly but if you aren’t, be aware that we are saving to the adf_publish branch and our pipeline is triggering on anything committed to the same branch. Saving will therefore trigger the pipeline, which may not be in a working state. To prevent this, simply add ***NO_CI*** to the end of your commit message to prevent the CI from triggering.
Here’s some definitions of what I’ve set up in those three tasks:
Stop & Start ADF Triggers tasks#
| Attribute | Description | Example |
|---|---|---|
| task | This is the name of the task and is driven by either the assistant or the drop down list. If you mis-type something here you wont see the “Settings” link appear above the task that allows the pop-out of the assistant. | |
| azureSubscription | This is your Azure subscription and is selected from a drop down list | |
| ScriptType | This is the type of PowerShell script we’ll execute. | This can be inline or a filePath |
| ScriptPath | This is the path to the PowerShell script we want to execute. As we’ve checked out (downloaded) the code from our config repo we can prefix paths with the variable $(System.DefaultWorkingDirectory). We then reference the name of the repo (only needed as we checked out more than one) and the path to the ps1 file | ‘$(System.DefaultWorkingDirectory)/cpo-configs/cicd-configs/adf-maintenance.ps1’ |
| ScriptArguments | These are the script parameters required to run it. As above, we use the prefix and the name of the repo at the start of the file path to the main ARM template. | |
| The other parameters are for where we want to stop the triggers. Enter your test environment here. | “$(System.DefaultWorkingDirectory)/cpo-datafactory/cpo-adf-dev/ARMTemplateForFactory.json” | |
| azurePowerShellVersion | This is the version you want to target. Leaving this on default as “LatestVersion” is fine |
Take a look at Microsoft Docs for more details on the Azure PowerShell task
ARM Template deployment task#
With the ARM template deployment task, your overrideParameters options may vary depending on the requirements for your pipelines. This allows you to update references to Key vault, update the factory name, region (if required), and other connection string info. More specifics can be explored in
| Attribute | Description | Example |
|---|---|---|
| task | This is the name of the task. I recommend using the assistant to generate this initially as it is not easy to remember these even with the intellisense tab completion | AzureResourceManagerTemplateDeployment@3 |
| deploymentScope | Where are we deploying this template. This should be set to Resource Group | Management Group / Subscription / Resource Group |
| azureResourceManagerConnection | This is your Azure subscription and is selected from a drop down list. You may need to authorise the ability to deploy the ARM template from a pop-up when you select the appropriate subscription. | |
| subscriptionId | This is your Azure subscription and is selected from a drop down list | |
| action | This is the action you are performing and is a choice of 2 options | Create or update resource group / Delete resource group |
| resourceGroupName | As expected,the target resource group. This can be different from your development Data Factory. | cpo-adf-uat |
| location | This is the region for the resource group. | UK South |
| templateLocation | Option drop down for where the template file will be sourced | Linked artifact / URL of the file |
| csmFile | The JSON ARM template file. This will refer to the repo we have checked out so can be prefixed with the variable $(System.DefaultWorkingDirectory). | ‘$(System.DefaultWorkingDirectory)/cpo-datafactory/cpo-adf-dev/ARMTemplateForFactory.json’ |
| csmParametersFile | This is the ARM template parameters file that will allow us to pass different environment, key vault and linked service values in to the new Data Factory | ‘$(System.DefaultWorkingDirectory)/cpo-datafactory/cpo-adf-dev/ARMTemplateParametersForFactory.json’ |
| overrideParameters | This is where you populate the parameters requested in the file. In the classic mode this would pre-populate for you which it will not do here. Check the information icon on this text box in the assistant for more info | |
| deploymentMode | This determines how the ARM template will be deployed. Select Incremental to “add” to the resource and not entirely delete and re-create. | Incremental |
IMPORTANT: You must use Incremental for the deployment mode. Doing a complete deployment will destroy your Data Factory!
Take a look at Microsoft Docs for more details on the Azure Resource Group Deployment task
Running the pipeline#
We’re now ready to run our pipeline. We have our tasks defined and ready to go. We can trigger the pipeline by publishing a change in Data Factory or by saving your YAML config and ommitting the ***NO_CI*** flag at the end of the commit message.
If you use the additional git repo as described above, you will also have to grant permissions to use it the first time the pipeline runs. This will show as a pop-up in the run and you can click View then Permit to grant the required permissions.

Permission request for additional repo
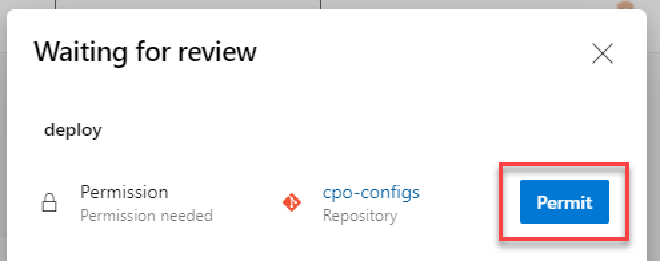
Permit access to additional repo
Once triggered you can monitor the pipeline by clicking into it on the Pipelines page where you’ll see all Runs and the outcome/duration etc.

Successful pipeline run
You can dig in deeper by clicking on each run and then each stage to see how each task was performed on the agent and where any errors arose.
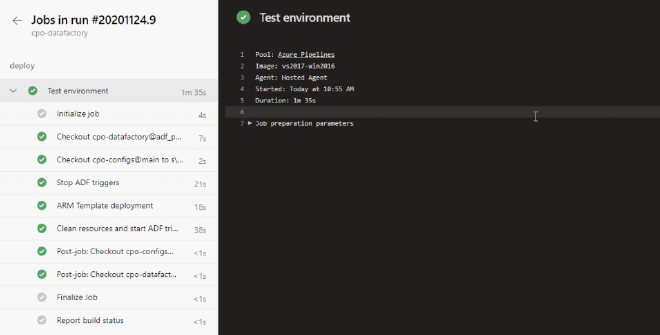
CD pipeline run job details
Next Steps#
You can take this deployment pipeline further by adding approvals and gates for deploying to the Production environment. Details on how to do this are in docs.microsoft.com: Release approvals and gates overview.
In the next post in this series we’ll plan out how our CI/CD pipelines will work with Integration runtimes.